Drone and UAV Technology Reviews, Articles, News, Build Logs
Putting together this X-Speed 250 racing quadcopter from ArrisHobby.com has been a blast. To date all the birds I’ve built or bought have been larger, slower, GPS stabilized craft with the purpose of capturing photos and video. Those types of multirotor copters are designed to fly smooth, easy, and not bank more than a few degrees. Not the case with this drone. It is built for SPEED, agility, and acrobatic flight. I have no skills in that area and learning to fly that way after doing a couple of years of stabilized flight is tough.
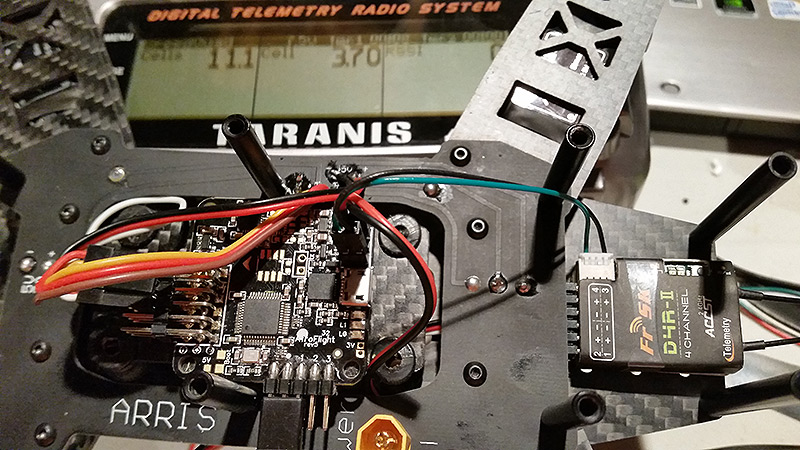
Telemetry – Acro Naze32 flight controller with FrSky D4R-II receiver and Taranis
The learning curve for the Naze32 flight controller is tough too. I’ve been soaking in all the information I can and I’m quite amazed at what sub-$25 item can do. I’ve gotten the bird airborne in the last week or so, and have now started adding some of the extras I’ll want. First off is battery telemetry. On my photo ships I have the nice lady who lives inside my FrSky Taranis transmitter read me off my battery and cell voltages. That way I know when to begin heading home for a landing to preserve the life of the battery. I want the same functionality on my X-Speed 250, the lady reading me voltages and being able to see the voltages on my transmitter.
I did a ton of reading and watched several instructional videos on getting the telemetry working. Most pointed out how “simple” it should be to get the battery telemetry from the D4R-II to the Taranis. There are two jumpers, one ground and one signal, for telemetry on the Naze32 board. Those attach to the telemetry port of the D4R-II. Fine. I did that. I made up a nice cable for it too. In the photo above see the green and black wires going from the D4R-II to the Naze32 board. Though I thought my setup was right, I got zero volts.
Missing Link
What most of these instructional videos and online instructions failed to clearly mention, at least the ones I found, is that there is another set of wires to install. The 2nd row down from the telemetry pins on the Naze32 are two battery pins, a hot and a ground. A quick glance at those one might think, “this is a battery input to supply power to the board.” That’s what I thought. But my board is getting power from the BEC of one of the ESC’s, so I never hooked it up. That battery port is NOT for getting power to the board though. It is there for the reason of getting battery voltage for the telemetry! Any kind of battery up to 6S can be hooked to those ports. In the photo above you can see a red and black cable in the middle. That cable is going from the battery port on the Naze32 to the underside of the Xt60 battery connector (yellow at bottom).
Once that black and red wire was set up total battery voltage is parsed through to the telemetry pins and voila, the lovely Taranis lady reads me off my numbers. I assume she’s lovely but have never actually seen her. You can also see the voltage numbers in the photo as the Taranis transmitter is at the top. Left is total volts and middle (3.7) is the per-cell voltage. The system is not able to read each cell individually though, it is just dividing the total voltage by three in my case, the number of cells in the battery (3S).
Many recent news stories detail people who are shooting down drones which are flying over their property. My very limited understanding is that shooting the drones down is in general not legal, and some are facing charges for discharging a firearm inside city areas.
Most of these people don’t understand that the drone can’t “see everything.” Unless the aerial vehicle is a few feet away, it probably can’t see their wife sunbathing in the backyard. A camera with a long lens or a covertly placed camera phone can gather much more juicy imagery than a noisy flying weedwhacker. But that’s not the point of this article.
How To Take Down A Drone
If your neighbor is flying a drone and you want to bring it down there’s no need for a gun. No need to call the police. No need to freak out.
The best anti-drone weapon on the planet can be found at many common stores and only costs a few cents…
All you need to bring a drone down is a loose ball of yarn. Toss it up in the air and watch the drone come down for an unintentional crash landing. Then you can have a “discussion” with the drone “pilot” about flying over your property, and the “finder’s fee” you’d like to collect to return the pilot’s drone to him/her.
If you wish to buy a drone defense system, I have them for sale at $99.99 each with free shipping!
I’ve been fairly satisfied with my second frame for my Alien 680mm Quadcopter. The “Alien” frame is a foldable design, meant to be more portable and easy to transport. Unhappy with the first frame I purchased, I picked up a second one and transferred all the parts. It has been much improved.
Part of the catch with my new frame is the foldable arm mounts were weak. I ran into some issues trying to level my motors and noticed that the arms were not level with each other, and were actually sagging. There was some play in the arms, vertically and horizontally. Imagine how messed up that could be in flight with arms moving up and down and the flight controller trying to compensate. And over time that play in the arms would certainly end up in an arm failing.
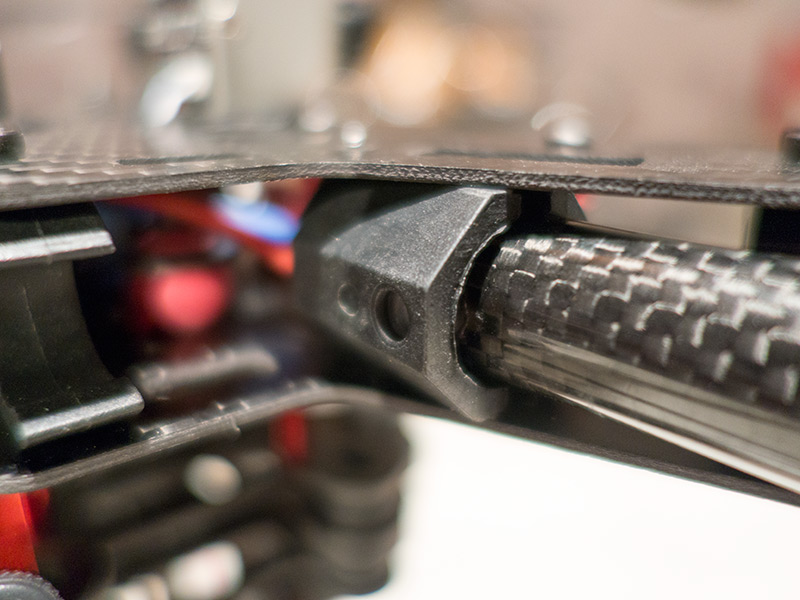
Notice how much play there is around this clamp? Bad bad bad.
I took a look at the old mounts which came on my first frame, and those happened to be more solid, by a long shot. So I ripped apart the bird and replaced the weak arm mounts with the more solid ones from the old frame. The difference is remarkable. My bird is much more stable and the video quality is better. I will have to mod the folding clamps a tiny bit but that’s not a big deal.
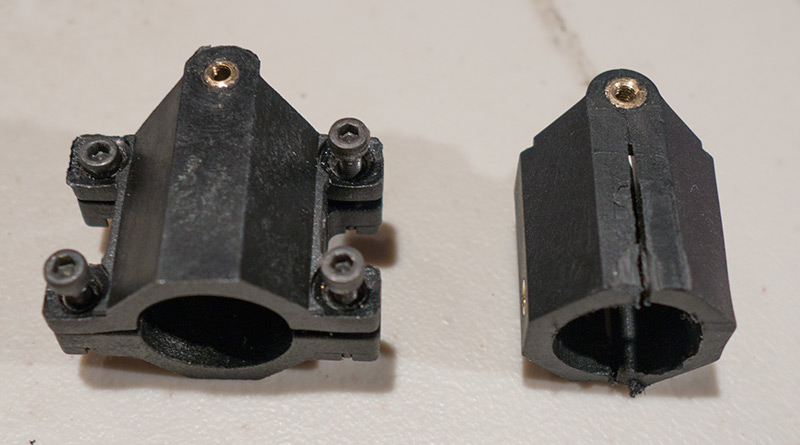
Left: the better 16mm arm mount
Right: The weak one which was removed
It’s nice to have an entire extra frame of parts to pick from when building or tweaking a build of a multirotor copter.