Drone and UAV Technology Reviews, Articles, News, Build Logs
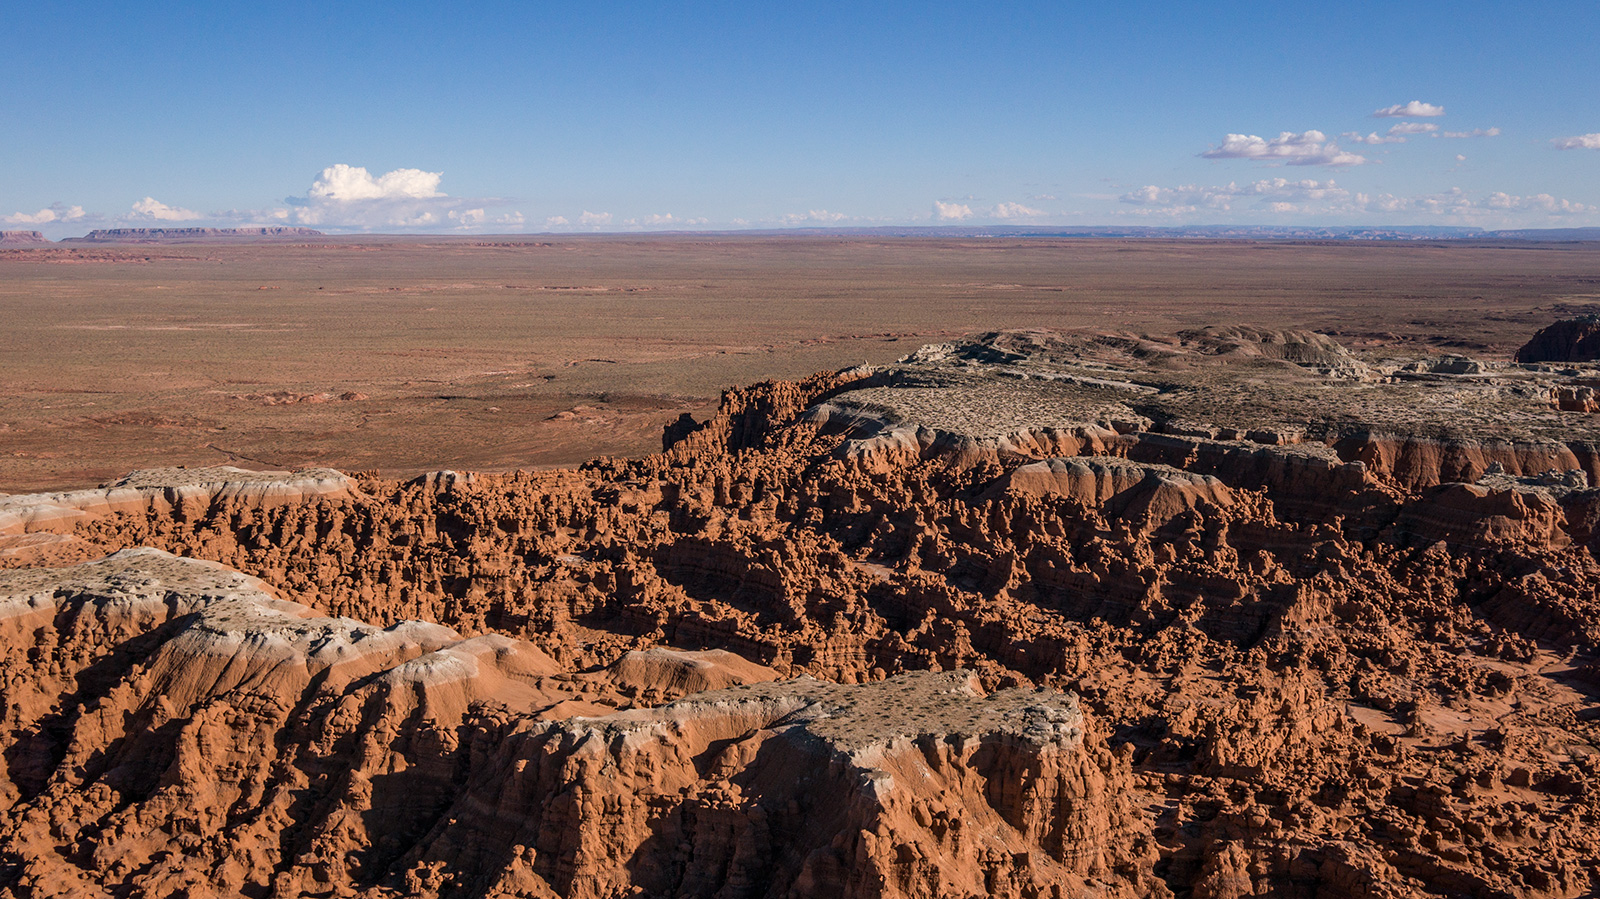
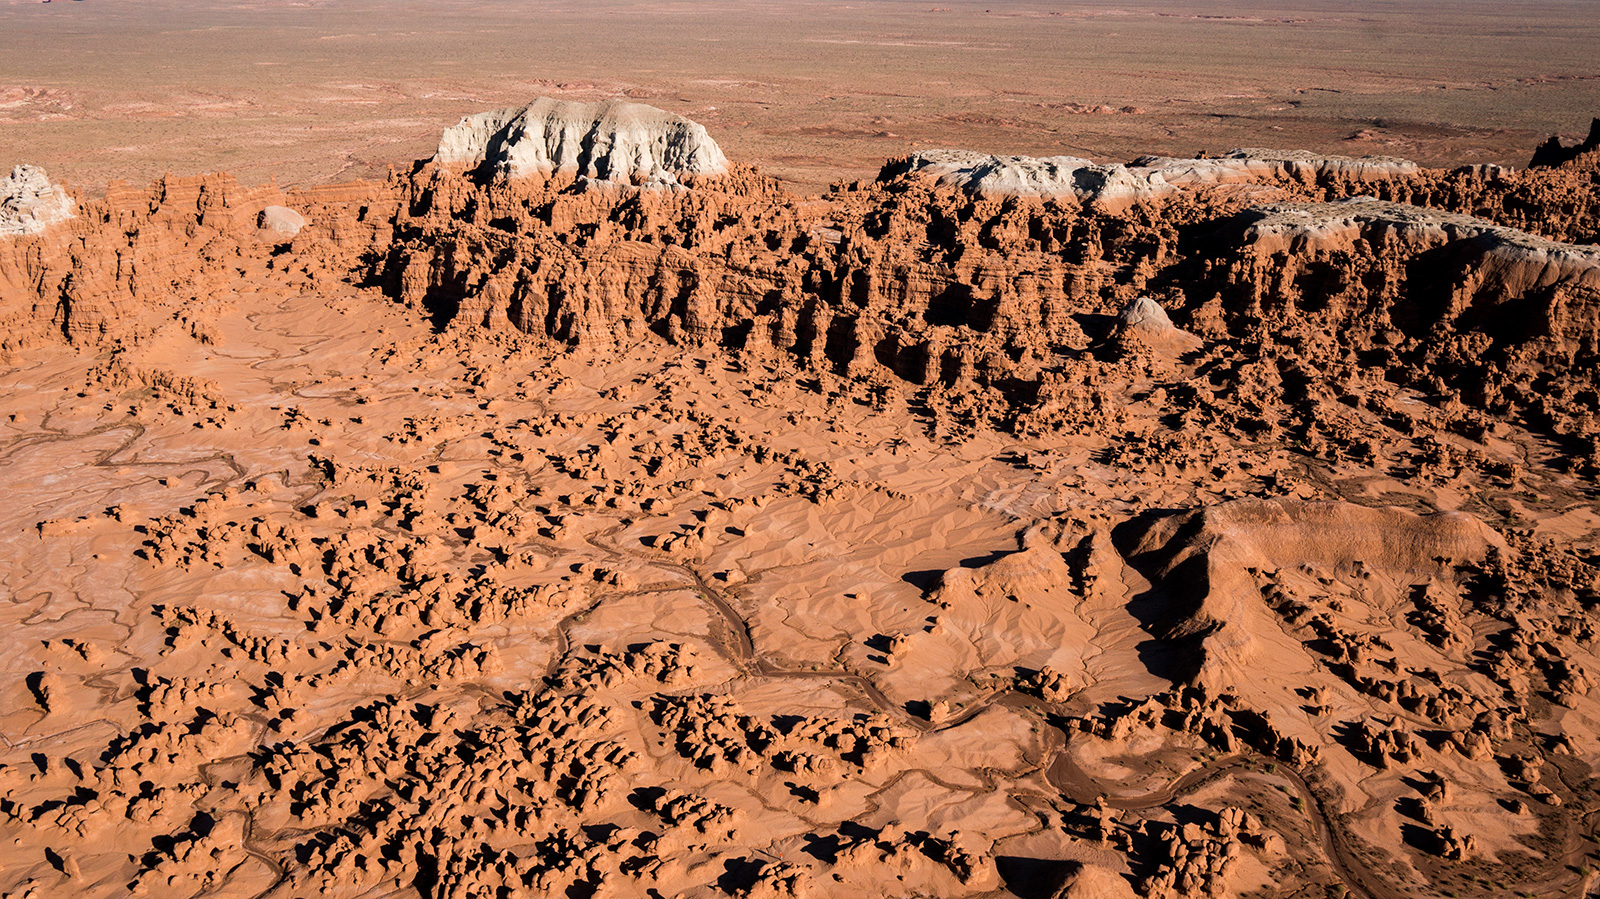
A couple of days ago I did a flight over central Utah’s Goblin Valley State Park. This is a very unique place full of thousands of rock formations known as hoodoos, which look like goblins. Thus the name.

On the ground the area is like a maze but I was curious to see what it looked like from the air. I checked with the park ranger first and made sure I had permission to fly the area. I did one hexacopter flight during which I was able to capture 375 photos.
I would have done another flight or two for some video footage, but the battery on my camera died. Shooting that many photos ate the battery up quickly.
I should pick up an extra battery for that camera, or perhaps find a way of supplying the camera power from the bird.
I always have to be building or tweaking something in the drone world it would seem. It’s like an addiction really. Unsatisfied with GoPro images, I’m hoping to get my old Canon S95 or my new Sony RX100 camera mounted on a gimbal on my 680mm Alien quadcopter.
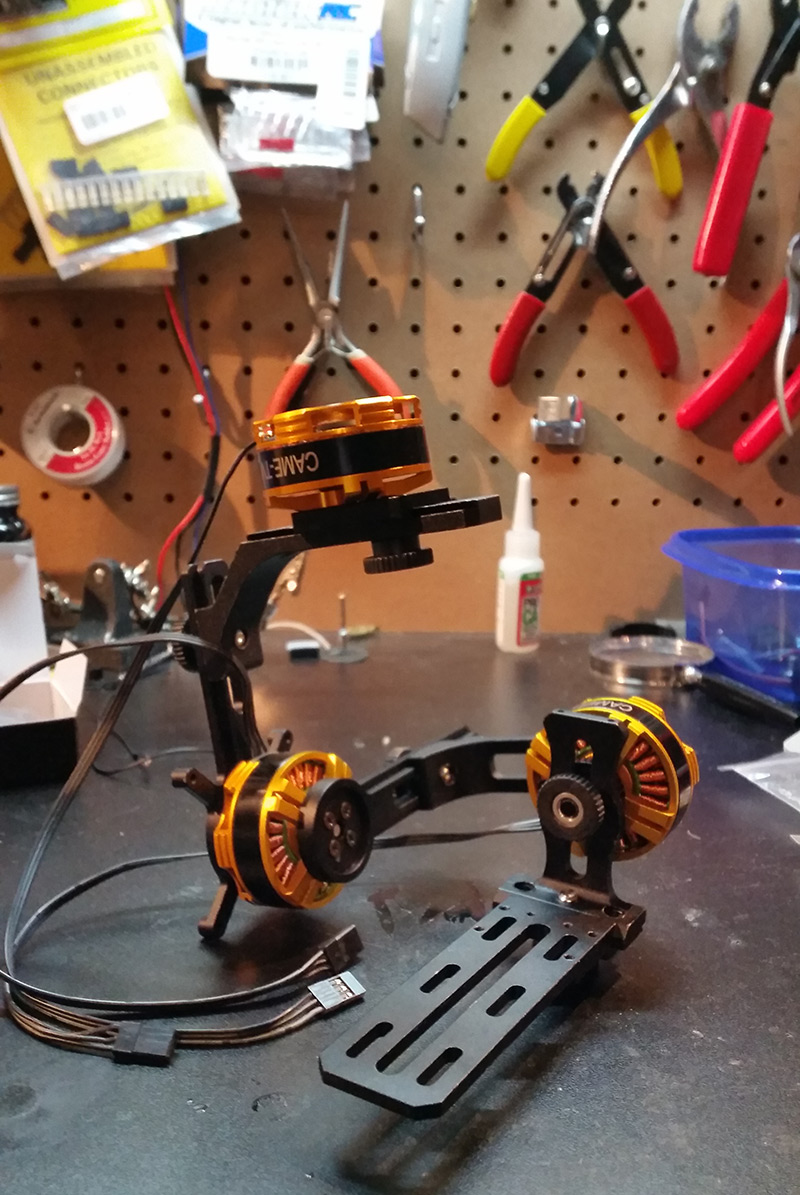
3-Axis Gimbal
After a lot of research I decided to pick up this “DYS” 3-axis gimbal pictured above, on Amazon. The main parts are milled aluminum and I like the way they can be easily tweaked for balancing various cameras without even needing a tool. This gimbal will hold a NEX camera as well, which is the one I use on my large hexacopter. This gimbal could save a lot of weight as compared to the very nice, but overbuilt Arris Zhaoyun 3-axis gimbal I’m currently using.
Part of the reason this setup above is inexpensive is it is not assembled. Versions may come in 2-axis or 3-axis, and often times the controller board is not included. I have a SimpleBGC 32bit controller ready to go for this unit. I’m almost ready to start mounting that part, then will come the PID tuning.
I’m going to be on vacation for a few days, so this project will probably be on hold for a week or so, but looking forward to getting this rocking on a foldable bird I can take to remote locations.
Here’s where I bought the DYS 3-Axis Gimbal.
 I’ve had the pleasure of testing out a Yuneec Typhoon Q500 4K ready-to-fly (RTF) quadcopter drone for the last few weeks. It has been a fun experience which has me really thinking about all the time I’m spending building and adjusting drones when I could be flying them.
Features (this is my list, not a list from Yuneec)
RTF – Ready To Fly
As mentioned the Q500 4K is an RTF unit. This means it is “ready to fly” just about right out of the box. Barring some battery charging and very minimal setup and configuration, one can be flying this bird in short order, 1.5 hours after purchase (battery charge time). A word of advice though, especially for those who have little to no experience flying, read the manual first. Read it twice. Read it three times. Safety is very important and you don’t want to damage your new investment or crash into someone or someone’s property.
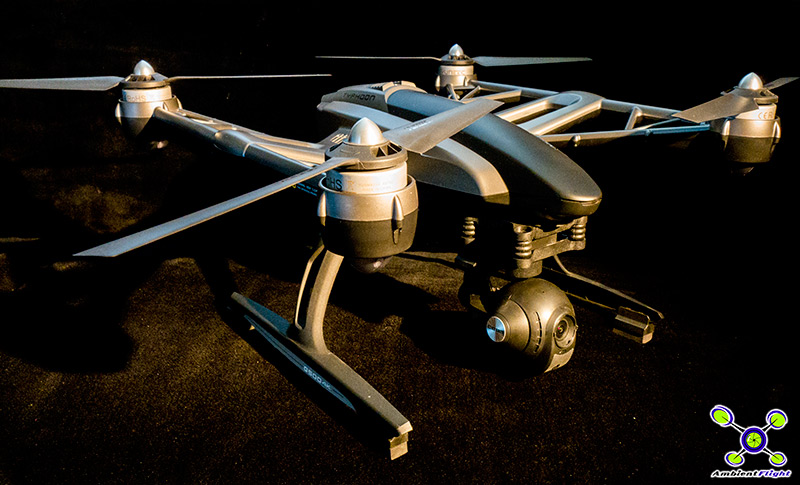
Yuneec Typhoon Q500 4K Drone
For me ready to fly is a whole new world. I’ve been building drones for a few years now. It is not uncommon for me to spend days or weeks setting up a camera on a drone, tweaking the gimbal, eliminating vibrations in the video (known as jello). That has been an extremely tedious and time consuming endeavor. Those hundreds of hours could have been eliminated by simply buying the Q500! The video for me was flawless right out of the box, on the first flight. You’ll see that first flight footage in my Q500 4K highlights video below. The footage is the overhead soccer shots of the young boy kicking a ball. That young boy is my 2.5 year old.
Size/Stability
This drone is slightly bigger than some of the very popular models in the same price range from other companies. The extra size, bigger motors, and larger props help this quadcopter attain better stability and not be thrown around by the wind as much. Better stability in the air means better video quality as well as less worry about keeping control of the copter.
Flying
Flying the Q500 4K Typhoon could not be easier. First, one arms the propellers by hitting the red button on the remote. For safety the button has a ring around it which makes the pilot work to push it. This helps prevent the user from mistaking the arm button for the take-photo button during flight.
There are a few different flight modes depending on how the pilot wants to fly the Q500. The copter utilizes GPS positioning to stabilize the flight and the copter’s position. In the most auto stabilized mode which is best for new users, the copter will keep itself level, hold its altitude and hold its position, even in wind. In this mode the pilot can literally let go of the controls and the copter will automatically hold its position in the air, both in altitude and horizontal position.
One fantastic flight mode is the Follow Me mode. Once enabled the copter keeps its relative position and height from the remote. As the remote moves, the copter moves with it and requires no input from the pilot. Follow Me is great for filming skiing, biking, cars, boats, running and more. Get great action video from an angle previously never possible. Be careful in Follow Me mode though. The copter is not smart enough to avoid obstacles. If the copter is following the target and obstacles like power lines, tunnels, or trees are in its path, it will crash.
Similar to Follow Me mode is Watch Me mode. In this mode the copter is holding its position in the air while the subject (location of the remote) moves. The copter rotates in conjunction with the camera and keeps the subject in the video frame.
The Q500 does have a Manual Mode but this mode is not easily enabled, which for most casual flyers and beginners is a good thing. In manual mode there is no internal stabilization. The pilot must have some good piloting skills to keep the copter in control. Beginners should not fly in manual mode. In fact, they shouldn’t even think about it.
The included remote has a full color screen which shows a live stream of what the camera is seeing. This is called FPV or first person view. The pilot can frame up videos and photos perfectly via this screen. Basic flying with this unit should be done via LOS (line of sight) however. Flying via the FPV screen is not a good idea. There is some lag (delay time) between the camera and the FPV monitor on the remote.
Smart Mode is a mode which is good for beginners, or those who have some trouble with what direction the copter is pointing. It can be hard tell what direction front is when it is 300 feet up and a few hundred feet away. In Smart Mode the bird always moves the direction the right stick is pointing, no matter where the front of the craft is. So if the pilot wanted to bring the bird closer, pulling back on the right stick would do the trick.
Angle Mode is a flight mode for more experienced pilots. In angle mode the craft flies in the direction of the controls, relative to the front of the bird, not relative to the pilot’s orientation. So if the bird is flying forward toward the pilot, banking right on the transmitter would result in the copter moving to the pilot’s left as he/she is looking at it.
Home Mode
One very necessary feature is the Return to Launch or “Home Mode” as it is called by Yuneec. Flipping a switch on the remote to Home Mode will activate the copter’s internal brain to return to where it took off and automatically land. This is a great feature if the user is having trouble with flight direction or has lost sight of the craft. Losing sight can be very frightening but after activating Home Mode the pilot will soon be happy to see the bird flying by itself, and landing where it took off from.
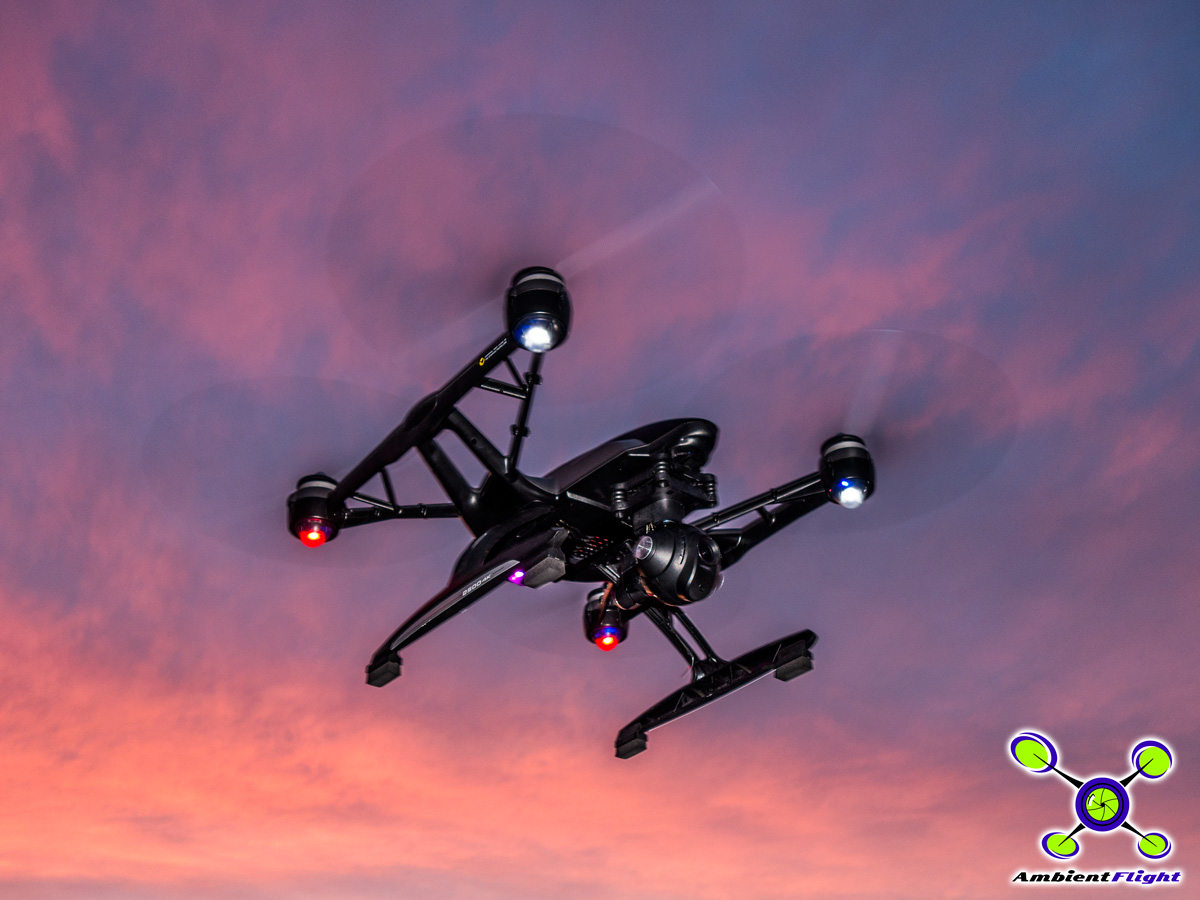
Yuneec Typhoon Q500 4K Drone in Action!
Flight Time
Yuneec advertises up to 25 minutes of flight time on the supplied 5400mAh batteries. I find that flight times vary greatly depending on conditions and flying style. The more wind or the more aggressive the flight style, the lower the flight time will be. In no wind with very conservative flying one might even exceed 25 minutes. My average time is between 15-20.
When the battery begins to run low during flight, the remote will vibrate and give the pilot a message on the screen indicating it is time to start moving toward landing. This is a great function. As battery levels get more critical, the bird will auto-land to save the battery.
Safety
We have been hearing some bad stories about drones being in places they should not be, like airports or too high. The Q500 comes with some built in safety measures to help prevent these things from happening. This industry needs these measures badly, to prevent idiots from doing idiotic things.
The arm button mentioned above is one great safety feature, which helps prevent accidental disarming of the props in flight, and accidental arming on the ground. Also mentioned above is the low-battery warning, which will help prevent this unit from dropping out of the sky in a bad place.
A very good safety feature in the Q500 is the altitude limit of 400 feet. This keeps it within FAA regulations and helps prevent accidental or intentional flights into restricted altitude.
Another altitude safety feature prevents the drone from flying above 8000 feet above sea level. I have a small problem with this. I live at 5000 feet and can often take off in the nearby mountains at altitudes of over 8000 feet. I’ve taken off at about 8600 feet and gone up to 9000 easily with my other craft. Can’t do that with the Q500.
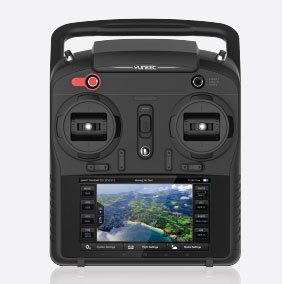
Yuneec ST10+ Transmitter
ST10 Remote/Transmitter
The transmitter which comes with the Q500 is the ST10. The ST10 is an absolute work of art, full of amazing technology and features. Obviously the basic controls (sticks) function to guide the copter’s altitude and direction. Many more features and controls make the Q500 user experience amazing.
As mentioned in the flight modes above, switches control how the copter flies. Angle Mode, Smart Mode, Follow Me, Watch Me, Home, Manual etc. On the side of the remote is a wheel with a rabbit and a turtle icon. Moving the wheel to the rabbit puts the Q500 in the fastest mode. The bird will be more responsive and can perform more agile movements. Moving the wheel to the turtle slows the bird down for smooth motion and less sensitive controls. Beginners should probably start out in turtle mode.
A very sharp 5.5 inch LCD monitor is included in the ST10. This monitor is the heart of the control center for the Q500. The monitor shows the pilot what the camera is seeing, and gives the pilot telemetry information such as latitude and longitude, altitude (very useful), number of satellites locked, battery voltage, home position (shown by a directional arrow) camera settings and more. By seeing what the onboard camera sees the pilot can position the bird perfectly for photos or video capture. For sunny days there is an included sun shield which can attach to the ST10 to eliminate glare and make the images easier to see. Yuneec really thought of everything a pilot might need.
On the opposite side of the ST10 from the rabbit knob is a pan/tilt knob for the 4K camera. This allows the user to tilt the camera at an angle. As you can see from the demo video above, the look one can get from directly above can be stunning. Check out the child playing soccer from above, forest from above, and fireworks from above! Amazing views only possible via a drone like the Q500.
The ST10 runs on the Android operating system. I wonder if I can check my email with it?
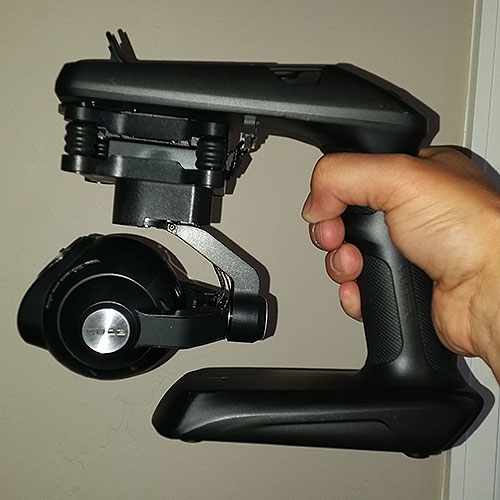
Yuneec CG0 Steadygrip Hand Gimbal
Gimbal Camera
The included CG03 camera packs a lot of punch for aerial photography and video. For still images the camera produces 12 megapixels and in the video realm produces 4K video and frame rates from 24 to 120 frames per second!
As one who has worked with GoPro cameras mounted to UAV’s, there are many features I like better about the CG03. Most noticeably is the lack of lens distortion. GoPro cameras with their super-wide lenses produce “bent” images around the sides of the frame, and horizons can often look completely bent and distorted. While no lens you can get airborne is completely free of lens distortion, the 115 degree lens of the CG03 by far blows away GoPros in that respect. The 12MP images are better looking than GoPro images as well, even shooting in raw format which is not possible on current GoPro platforms.
Now don’t confuse this type of camera/photography with mirror-less or full sized DSLR cameras. These are two completely different animals. If you are shooting images for National Geographic, you’re probably not going to get the results you want out of the CG03. That said, the overall value of the setup is impossible to beat.
Included with the Q500 is the CGO Steadygrip hand gimbal mount. The CG03 camera can be removed from the Q500 and put on this sleek and comfortable hand grip. This puts the power of a gimbal controlled 4K video camera in a person’s hand for action video skiing, biking, running, driving, OHV riding, boating etc. I can’t wait to put mine in action this winter on the ski slopes. I actually built my own gimbal for a GoPro but this one blows it away. The top of the unit opens up to mount a smartphone or small tablet which can be used as a video monitor. Genius.
Accessories
The folks at Yuneec did think of everything. EVERYTHING. The 4K comes with all sorts of great accessories. Naturally a balance battery charger is included but it also comes with adapters to charge from the car or boat.
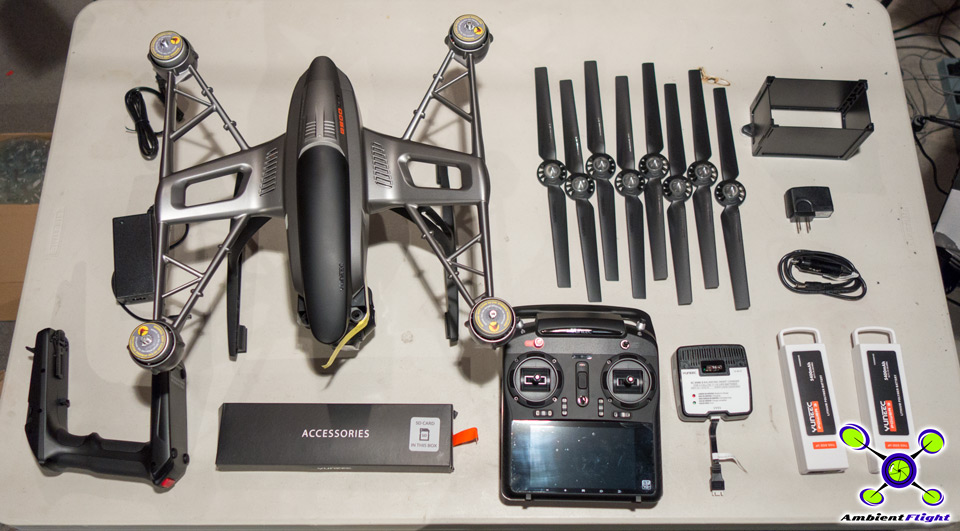
Yuneec Q500 4K Box Contents
Other accessories in the package include extra propellers, ST10 neck strap, USB programmer, extra battery, USB charger/adapter for the ST10, and more.
Below is an unboxing, showing all the accessories, the bird, and the case.
Case
Where does one put this amazing copter, remote, gimbal, extra batteries, charger, accessories? In the very sharp included aluminum flight case of course.
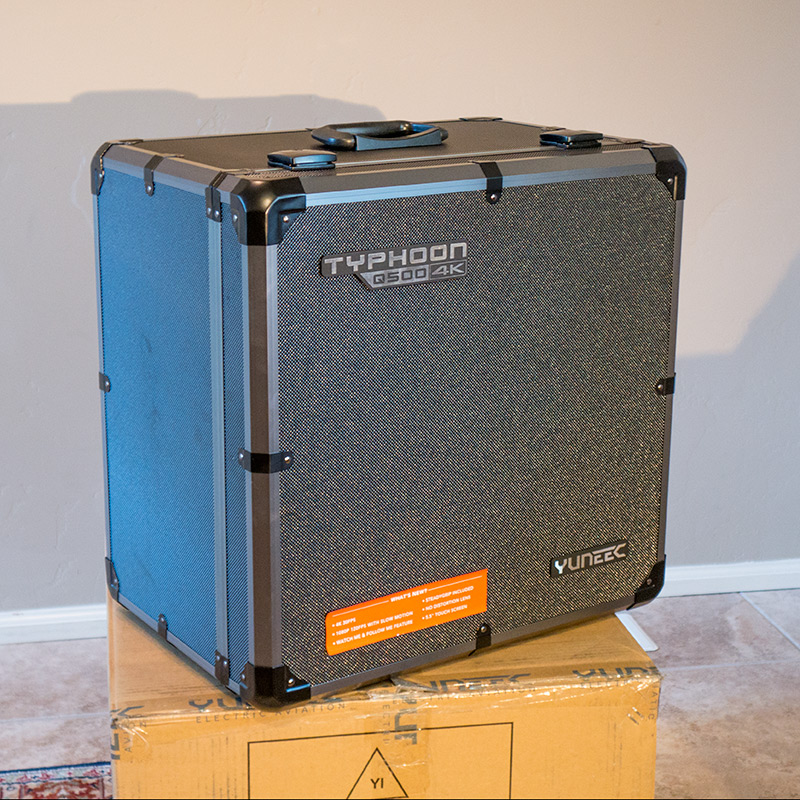
Yuneec Typhoon Q500 4K Drone Case
The case is perfect for traveling and keeping the Q500 safely stored enroute to the next great flying session.
Final Thoughts
I’ve been building my own unmanned aerial vehicles for a few years now. The amount of time and expense it takes to get a copter like this flying is quite high. The tweaking and adjustment time to get a camera and gimbal setup which produces clean and vibration free video is extremely painstaking. I’ve spent literally weeks adjusting copters/gimbals to get decent video out of them. The amount of money spent on gimbals, cameras, electronics, FPV gear, runs in the thousands. The Q500 comes along and does it all right out of the box for under $1500? Unreal.
Yuneec’s engineers have done all the engineering, testing, tweaking. No tweaking needed to get great aerial photos or video. Buy it and fly it. There is no drone out there which has this many features built in, is as well planned out and designed, and produces what the Q500 does. Dollar for drones there’s no better buy.
Related Links
Now that you’re ready to buy one, pick up the Yuneec Typhoon Q500 4K drone at Amazon.