Drone and UAV Technology Reviews, Articles, News, Build Logs
Admittedly I was quite disappointed with the quality of my first videos and photos when I finally got the Phantom airborne with the GoPro. The vibration from the props was making the GoPro video shake, called the “GoPro jello effect.”
After a bunch of searching I found some solutions, one which was only $12 on amazon.com, DJI Phantom GoPro Anti Vibration Anti-Jello Vibration Isolator Low Profile Carbon Fiber Mount.

GoPro DJI Phantom anti-jello mount
I must say the results have been huge. No more jello or lines in the video. Next is the gimbal, which is on the way.
Conditions were calm, presenting a great opportunity to head down to my home course River Oaks to try some aerial video with the DJI Phantom Quadcopter and my new vibration damping attachment. River Oaks can be extremely windy, so when calmer conditions present themselves, its time to hit it.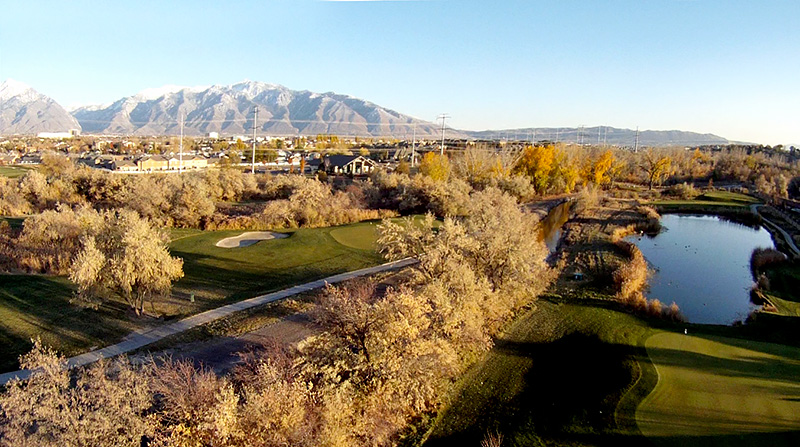
It was VERY cold, but the Phantom did well.
Lighting
Just like regular photography/video, lighting is key. The sun was setting and there was some great light and shadows (above), for a while. Those shadows made for good imagery.
I also need to keep in mind where the light source, the sun, is. For much of the video the camera was pointed at the sun. The GoPro doesn’t do terribly when when facing into the sun and since it doesn’t shoot raw, I can’t mess with the exposure. But then again, you can’t shoot video in raw…
Piloting
Once the quadcopter gets to about 170 yards away it is but a tiny object and hard to see, even with my glasses on. It is almost impossible to tell what direction the copter is pointing. In GPS mode I can stop the unit and it will hover in place, then I can try some small directional moves to see if I’m sending it farther away or closer. The problem there is that there’s quite an illusion with distance. It can actually look like the unit is getting closer to you when it is actually going farther away, and vice versa. That’s a tough one I’m not sure how to deal with just yet. I handled it more calmly this time, unlike the last time when it went over a fence and crashed into a tree.
Flight Time
I certainly need to get a small stopwatch and perhaps velcro it to the remote. With the GoPro mounted, I get about 10 minutes of flight time. Once the battery starts to die, the unit will land itself. That’s great, unless it is over a body of water or over the freeway.
If I’m flying over bodies of water or areas in which the copter simply cannot land, I need to start those with a fully battery and be fully aware of how many minutes flight time there is left. I need to be sure to give myself enough battery power to get the unit back before it lands on its own.
Video
I’m uploading a video to YouTube from today. It is greatly improved with the vibration damping system. BUT, a gimbal is sorely needed to keep the video smooth.
Soon!
Since I’ve started flying my remote control DJI Phantom quadcopter with the GoPro camera mounted on it, I’ve become very unhappy with the quality of the GoPro video and photos. The lens is way too wide, creating an obnoxious fisheye effect. Aerial photos or video can look pretty bad with this effect, as the horizon can look completely rounded.
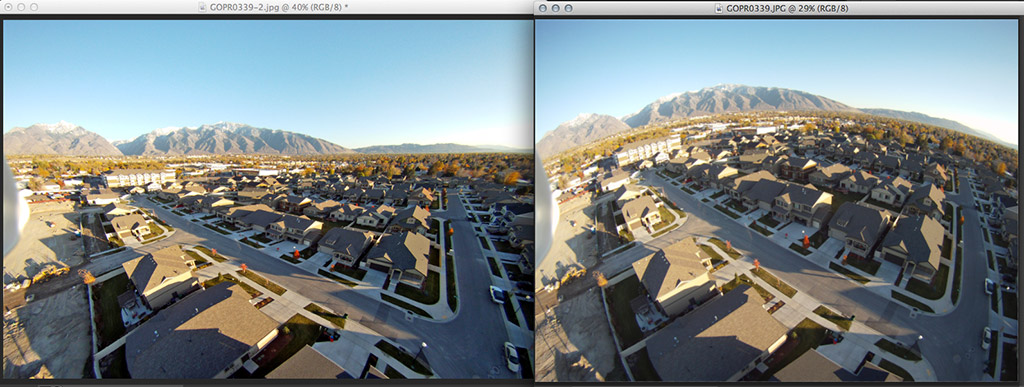
Left: Corrected – Right: Original (click to enlarge)
Yesterday I shot some stills high above the neighborhood with the Phantom/GoPro setup. I spent about 10 minutes mucking around in Photoshop with the liquify filter. From the photo above you can see the difference. On the right is obviously the original photo. On the left is the version I mucked with.
Once I have the process down I’ll post the steps. I may be able to create a photoshop action to automate this process. Stay tuned.